Showing posts with label desserts. Show all posts

Wednesday, June 22, 2011

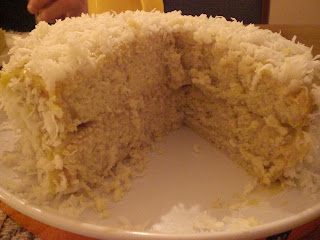
Coconut Cake

June means it's birthday time in my family!  Last week was my dad's natal day, so I made him a dinner of his choosing as part of my gift.

For dessert, he picked an oh-so-delicious but slightly tricky coconut cake.  "Beware!" my friends said.  "The boiled icing will be your downfall."

But I'm here to tell you that if you watch your icing carefully and follow the directions semi-carefully, you'll be A-OK.  And you'll have a light cake that's not too overwhelming for summer (or anytime) celebrations.

Wednesday, May 18, 2011

Strawberry Cupcakes

Disclaimer: These cupcakes are so delicious, I've made two batches in the last four days.  That's a lot of cupcakes, even for me.

Several months ago, I took an amazing cupcake class at Butter Lane in New York.  Since then, I haven't made a single cupcake, instead pining away for the magic of a stand mixer, to whose camp I became a firm convert after the class.  Thanks to a U of C audit in my favor (sounds like something out of Monopoly's Community Chest, but for real), I finally bought a beautiful refurbished KitchenAid and have been chomping at the bit to make something with it for about a week.

To celebrate the arrival of both my friend Britta, who is moving to the area for graduate school, and Shelly the Stand Mixer: Strawberry Cupcakes with Strawberry Buttercream Frosting.  This recipe is based on the Butter Lane class's recipe, but adjusted to reflect the different ingredients I had on hand and to incorporate the addition of fruit.


Tuesday, May 10, 2011

Berry Pie

As my gift to my mom this year for Mother's Day, I offered to make her any kind of meal that she wanted for dinner.  For dessert, she chose a berry pie—a great seasonal choice for the height of springtime's berry yield, which happens to coincide with Mother's Day.  So a happy belated Mother's Day to all the great moms out there (especially mine): This one's for you.


This recipe is adapted from another one of my favorite cookbooks, The Artful Pie.  Sadly, it is out of print, but definitely worth tracking down.  This particular recipe has been adapted to include less refrigeration time (seriously, I don't have time to refrigerate after every step, though I wish I did) and a wider mix of berries.  Why limit yourself?

Wednesday, March 30, 2011

Baklava

This past weekend, my friend Nina came to visit me from Chicago.  We had a good time exploring Chapel Hill and the surrounding environs and, of course, we ate pretty well.  Both of us love to bake, and we each come from cultures where baklava is a staple food group.  Basically, there was no other option on a rainy Saturday but to bake some of that flaky, buttery dessert.

With our two powers combined, we came up with a four-layer single-nut baklava drenched in sugar and butter.  Is it good for your body?  Probably not, though I can think of worse things to eat, dessert-wise.  But it is definitely good for your mood and your tastebuds, so I'd recommend you give it a try the next time you're feeling gloomy.  This kind of moist baklava can't be bought (or is extremely hard to find).

Monday, August 30, 2010

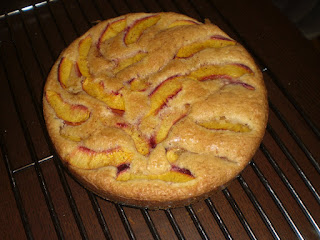
Nectarine Cake

My dad always tells me how important it is to "eat to live, not live to eat."  Consequently, there are very few foods that I allow to fall into my "worth-living-for" foods category.  Stone fruits, for better or worse, comprise a goodly chunk of that list.  Peaches, plums, apricots: I love them all.  So when I went to the farmer's market last week and found myself surrounded by stacks and stacks of lovely fruit, I couldn't help myself.  I had enough self-control to buy the least expensive type of fruit, but I still wound up carting three pounds of nectarines back to the office and then home on the subway.  Now, I can eat a lot of nectarines, but three pounds of perfectly ripe, rapidly spoiling fruit is too much even for me.  So what to do?  Bake a delicate dessert highlighting the fruit, of course.

This recipe comes from the now sadly defunct Gourmet.  I changed very little, as baking tends to be much more unforgiving of improvisation than other types of cooking.

Friday, May 21, 2010

Carrot Cake Cupcakes

Earlier this week, I promised someone carrot cake cupcakes.  Yesterday rolled around and it was time to deliver.  I found it surprisingly difficult to find a recipe that I liked (something that used butter instead of oil, had traditional carrot cake ingredients), so I based my recipe off of this one, but with some pretty serious tweaks.  These are almost "hummingbird" cupcakes, but not quite.  One quick note: I didn't make my own icing, and for that I am sorry.  Next time I make a cake-like item, you can expect an accompanying icing recipe.

You'll need:

1/3 cup butter, room temperature
3/4 cups granulated sugar
1 tbsp. honey
2 eggs
1 cup grated carrot
1 cup flour
2 tsp. baking powder
1 tsp. baking soda
3 tbsp. apple juice
1/2 cup raisins
1/2 cup crushed walnuts

Preheat oven to 350 degrees and line a dozen muffin cups with paper liners.

Cream together the butter, sugar, and honey until the mixture is smooth.  Beat in eggs one at a time, then add grated carrot (you can grate right into the bowl—that's what I did).

Stir in flour, baking soda, and baking powder in two parts.  Stir smooth, but don't overbeat.  Add apple juice and stir.  Add walnuts and raisins.  You should have a smooth, moist batter at this point.

Spoon the batter into the twelve muffin cups approximately equally.  Bake until golden and risen, so that when you stick a knife in the middle, it comes out clean.  This takes about 25 minutes.

Cool on a rack, then remove from pan.  Let cool thoroughly before icing (This was a mistake I made because I was in a rush).

When you're done, you'll get some sweet cupcakes like this:


And your friends will be happy and look like this:


I warned you, Alex.  Now it's on the Internet.

Sunday, February 28, 2010

Whopper Brownies and Raspberry Meringue Cookies

My younger sister, Juliana, and I have been planning to get together to bake something/have a dance party for weeks now, but it kept getting put off.  She finally came over this afternoon, and the results were of epically sugary proportions.

My original thought was to make meringue cookies, since I had leftover egg whites from a chocolate silk pie I made last week.  But since we needed to wait for the egg whites to reach room temperature, we warmed up our cooking skills with some Whopper brownies.

I got the idea for malted milk chocolate brownies after making the aforementioned chocolate silk pie last week.  It was supposed to be a chocolate malted silk pie, but the malt powder flavor just didn't come through.  I thought I'd give the malt powder another chance to prove itself, but with the aid of an entire movie theater-size box of Whoppers.

This recipe is based on the basic brownie recipe from my grandmother's copy of Betty Crocker's Picture Cookbook.

You'll need:
2 squares semisweet baking chocolate
1/3 cup butter
1 cup sugar
2 eggs
3/4 flour
1/2 tsp. baking powder
1/2 tsp. salt
2 tbsp. malt powder
1 5-oz. box of Whoppers

Preheat the oven to 350 degrees.  Grease an 8-inch square pan with a little butter.

Melt the chocolate and the butter and place in a large bowl.  Beat in the sugar and eggs.  After it is thoroughly mixed, beat in the flour, baking powder, salt, and malt powder.

You'll need to break up the Whoppers before adding them to your brownies.  We did it this way:


Which is to say, we sealed the Whoppers up in a plastic bag and then Juliana jumped on them.

You could also smash them up with a rolling pin or put them in a food processor or something, but after seeing this method, why would you want to?

Add the crushed Whoppers to the batter, reserving about 2 tbsp.  Mix well.

Spread the batter into the pan and then sprinkle the reserved crushed Whoppers over the top.  This makes a nice caramelized crust.

Bake for 30 to 35 minutes, or until the top of the brownies have a dull color.  Cool and then cut.  This recipe should make about 16 brownies.


For our next trick, we made raspberry meringue cookies, based on this recipe by Sandra Lee.

You'll need:
1/2 cup egg whites
1 tsp. raspberry extract
1/4 tsp. cream of tartar
1 cup powdered sugar
3 drops red food coloring

Preheat oven to 225 degrees.  Line two baking sheets with aluminum foil.

In a large bowl, beat together the egg whites, raspberry extract, and cream of tartar with a whisk until the mixture gets frothy.  Then add powdered sugar by tablespoon.  Continue whisking while adding the sugar.  Add food coloring, and keep beating until the mixture forms stiff peaks (as Juliana said to the meringues, "I want you to make Madonna's tits from the '80s").  This took us about 30 minutes with our whisk.  You could go a lot faster with an electric mixer.


Juliana demonstrates the type of exercises you'll need to do if you want to beat the whites by hand.

Spoon mixture into a pastry bag fitted with a medium star tip, then pipe into 2-inch spirals on the baking sheets.


Like so.

Bake in the over for about 50 minutes, rotating the pans halfway through.  When they are finished baking, turn off the heat on the oven, crack open the door, and allow the meringues to dry out for about 10 minutes.  Then you can just pluck them off the aluminum foil.

You'll get cookies like this:


This recipe made about 30 cookies.

They were slightly on the flat side, and more brown than pink, but they tasted airy and delicious.  Plus, the shapes were pretty hilarious.  Clearly we need more practice (and maybe an electric mixer), but this seemed like a reasonable first attempt.